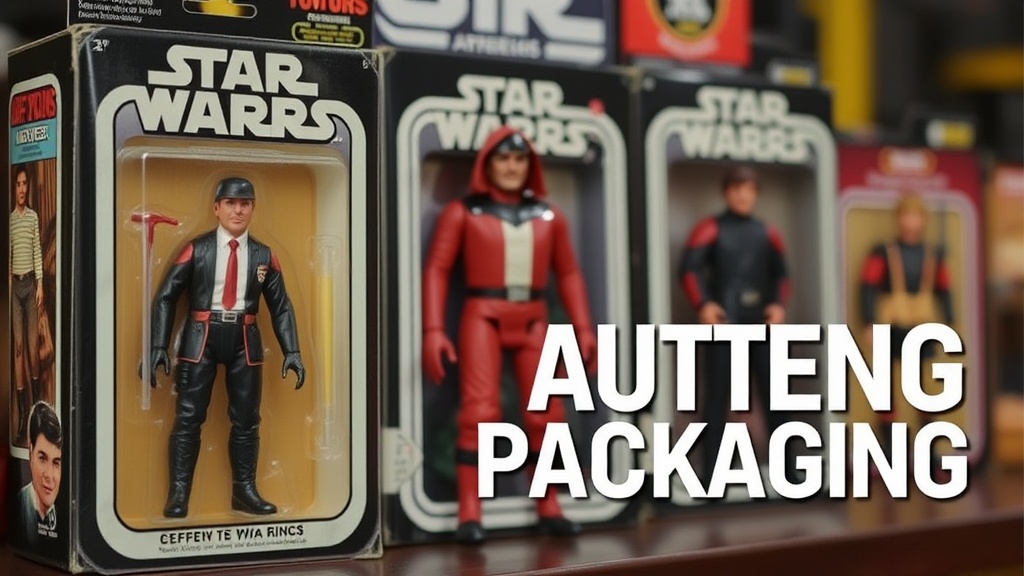
Spotting Authentic Vintage Action Figure Packaging

Roughly 30% of the high-end vintage toy market is currently flooded with high-quality reproductions and sophisticated counterfeits. This guide examines the physical markers of authentic vintage packaging for Star Wars Kenner figures, G.I. Joe, and Transformers, teaching you how to identify genuine cardbacks and blister bubbles through tactile and visual inspection. Understanding these nuances protects your investment and ensures you aren't paying premium prices for a modern recast.
How Do I Identify Fake Star Wars Kenner Cardbacks?
You can identify a fake Kenner cardback by checking for the absence of specific printing artifacts and the presence of modern-looking ink saturation. Authentic 1970s and 80s packaging was printed using older lithographic processes, which results in a different texture than modern digital printing.
Look closely at the edges of the graphics. On an original Star Wars card, the colors often have a slight "bleed" or a soft edge where the ink meets the cardboard. Modern fakes often look too crisp—almost too perfect. If the graphics look like they were printed on a high-end inkjet printer from 2024, be suspicious. The colors might also look overly vibrant or "neon" compared to the slightly muted, matte finish of genuine vintage cards.
Check the weight of the cardstock. Authentic vintage cards have a specific density. If the card feels suspiciously thin or flexible, it might be a reproduction. Also, look at the reverse side. Real vintage cards often have a specific texture or a slight yellowish tint due to aging (this isn't a bad thing—it's a sign of age). If the back of the card is a bright, stark white, it's a red flag.
The most common giveaway is the "dot pattern." If you use a jeweler's loupe—a tool I highly recommend for serious collectors—you'll see the way the ink is laid down. Authentic vintage printing often shows a distinct pattern of dots that is consistent with the technology of the era. Modern fakes often lack this or show a digital "noise" pattern that looks fundamentally different under magnification.
"The difference between a $500 figure and a $50 reproduction is often found in a single millimeter of ink bleed."
What Are the Signs of a Re-sealed Blister Bubble?
A re-sealed blister bubble is identifiable by the presence of glue residue, air gaps, or a lack of a seamless bond between the plastic and the cardback.
The "bubble" is the plastic housing that holds the figure. In the vintage era, these were heat-sealed to the cardboard. To check for a re-seal, look at the perimeter where the plastic meets the card. On an original, the seal is uniform and often shows a very slight, consistent indentation from the heat press. If you see tiny cracks, jagged edges, or any sign of adhesive residue, the figure has likely been "re-bubbleed."
Another trick is the "light test." Hold the figure up to a bright light source. If you see gaps where light leaks through the edges of the plastic, the seal has been compromised. A re-sealed figure often has a slight wobble or a different "click" when you tap the plastic. This is especially common with high-end G.I. Joe figures where collectors try to "fix" a broken figure by putting it in a new bubble.
Don't forget to check the plastic's clarity. Original vintage plastic can yellow slightly over decades, but it should still be clear. If the bubble looks incredibly clear and "new," but the figure inside looks 40 years old, someone might have swapped the bubble. This is a common tactic in the "re-sealed" market. It's a headache, but a necessary one to master if you want to avoid being burned.
If you're worried about your collection's longevity, remember that light and humidity are your enemies. You might want to look into UV-resistant cases to protect your figures from sun damage, as UV rays can degrade both the figure and the packaging over time.
How Can I Spot a Fake Transformers Cardback?
Fake Transformers packaging usually fails when you examine the font kerning and the specific "sheen" of the cardboard texture.
Hasbro and Takara had very specific printing standards during the 1980s. One of the easiest ways to spot a fake is the "font test." Counterfeiters often struggle with the exact weight and spacing of letters. If the "Transformers" logo looks slightly off-center or if the font in the legal fine print looks "blurry" or "fuzzy," it's likely a fake. The text on a real card is sharp, even if the paper itself is aged.
The texture of the cardboard is another big giveaway. Real vintage packaging has a certain "tooth" to it. It isn't perfectly smooth. If the card feels like a modern, glossy greeting card, it's probably a reproduction. This is particularly true for the larger box-style packaging used for many Transformers toys. The weight and the way the cardboard bends matter.
Here is a quick checklist for your next hunt:
- The Loupe Test: Use a magnifying glass to check for digital printing patterns.
- The Weight Test: Compare the weight of the item to a known authentic version.
- The Color Check: Look for the "muted" look of vintage ink versus the "vibrant" look of modern ink.
- The Seal Inspection: Check the edges of the bubble for glue or air gaps.
It's also worth noting that the "collector's market" is highly specialized. For more detailed information on the history of manufacturing standards, you can check the Wikipedia page on toy manufacturing to understand how industrial processes have changed.
The truth is, even the pros get fooled sometimes. The technology used to create "super-fakes" is getting better every year. You'll need to develop a "feel" for the items. It's not just about seeing; it's about the tactile sensation of the cardboard and the visual depth of the printing.
Is the Packaging Damage Real or a Fake?
Authentic vintage packaging damage is usually caused by natural aging, such as corner dings, shelf wear, or "veining" in the cardboard, rather than the jagged edges seen in modern fakes.
When a card has "shelf wear," it looks organic. The corners might be slightly rounded or scuffed from being moved around a store in 1982. This looks different from "reproduction damage," where a maker might try to artificially age a card by rubbing it with sandpaper or tea. Artificial aging often looks too uniform or localized. Real wear is random and widespread.
The "vein" effect is a great way to tell. On many vintage cards, the cardboard has tiny, hair-like cracks or "veins" that appear under high magnification due to the aging of the paper fibers. A modern reproduction will have a solid, unbroken surface under the lens. If the card looks "too perfect" despite being labeled as "vintage," it's a red flag.
If you are looking to display your finds, you'll want to ensure they are kept in a controlled environment. I've written about organizing display shelves for maximum visibility, which is great, but remember that visibility shouldn't come at the cost of protection. A well-displayed collection is a beautiful one, but a protected one is a valuable one.
One last tip: always ask for more photos. If you're buying online, ask the seller for a high-resolution photo of the corner and a shot of the bubble seal. If they hesitate or say the photos are "too blurry," walk away. A legitimate seller of high-end vintage items will have no problem providing the proof you need to feel confident in your purchase.
| Feature | Authentic Vintage | Modern Reproduction |
|---|---|---|
| Ink Pattern | Consistent lithographic dots | Digital "noise" or-too-crisp |
| Card Texture | Slightly textured/matte | Smooth/Glossy/High-sheen |
| Bubble Seal | Seamless/Heat-pressed | Visible glue/Air gaps |
| Color Profile | Muted/Natural aging | Vibrant/Neon/High-saturation |
Don't let the fear of being fooled stop you from collecting. The more you look at the real thing, the more the fakes will jump out at you. It's a skill that only comes with time and a lot of looking at small things.