Building a Custom Diorama for Your Action Figures

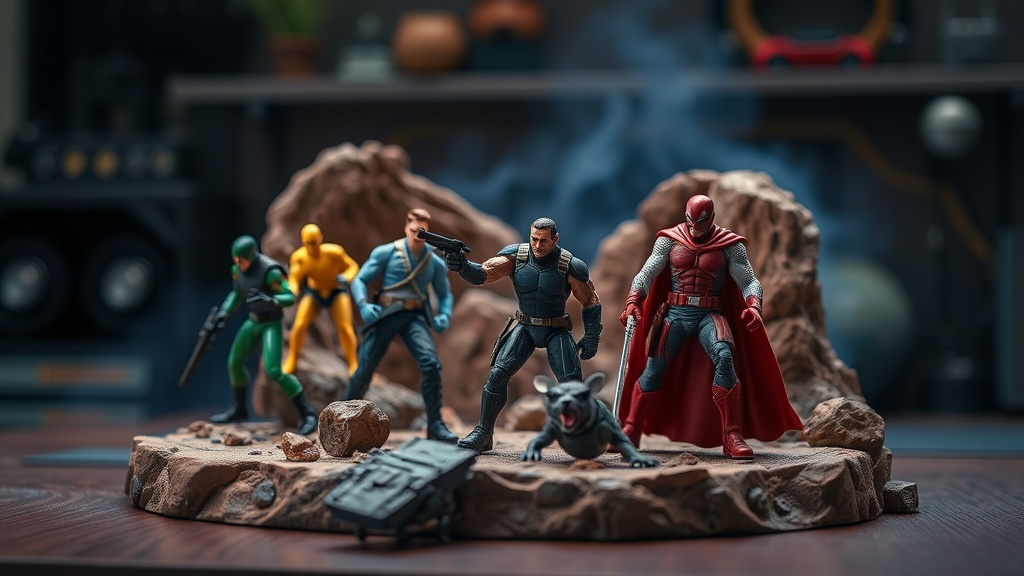
You have a high-end 1/12 scale Marvel Legends figure or a highly articulated S.H.Figuarts. It looks great on a shelf, but it feels static. It sits there, a piece of plastic in a void. A diorama changes that. It turns a single figure into a scene. This post covers the technical and creative steps for building a custom diorama, from selecting your base materials to managing scale and lighting.
Building a diorama isn't just about making a "cool background." It’s about creating a sense of place that complements the specific scale of your collection. If you're working with 1/6 scale Hot Toys, a standard tabletop miniature set won't look right. The scale mismatch kills the illusion immediately.
What Materials Do I Need to Start?
The best materials for a diorama depend entirely on your budget and whether you want something permanent or modular.
Most beginners start with foam board or XPS foam (extruded polystyrene). If you've ever seen those blue or pink foam blocks at a hardware store, that's your best friend. You can carve it, texture it, and paint it to look like stone, brick, or even futuristic metal. It's lightweight and incredibly easy to shape with a simple hobby knife.
Here is a breakdown of common materials used by hobbyists:
| Material Type | Best For | Difficulty | Cost |
|---|---|---|---|
| XPS Foam | Rocks, cliffs, or stone walls | Easy/Medium | Low |
| Balsa Wood | Furniture, crates, or wooden structures | Medium | Low |
| Polymer Clay | Small organic details (roots, bones) | Hard | Medium |
| Acrylic Paint | Priming and detailing surfaces | Easy | Low |
Don't forget the adhesive. You'll want a mix of PVA glue (white glue) for organic materials and a high-quality super glue for non-porous surfaces. If you're building something heavy, like a stone pedestal, a hot glue gun works for temporary holds, but it's not a long-term solution for a professional-looking display.
How Do I Get the Scale Right?
You achieve correct scale by choosing a standard ratio—such as 1:12 or 1:6—and ensuring every prop-to-figure ratio remains consistent.
This is where most people fail. They find a cool-looking miniature crate at a local shop, but it's actually 1:35 scale. When you place your 6-inch figure next to it, the crate looks like a toy box. It breaks the immersion. I've seen many collectors spend hundreds on "scale models" only to realize they're the wrong size for their action figures.
To keep things consistent, I recommend picking a "hero" scale first. If you collect Star Wars Black Series, you're likely in 1:12 scale. If you're building a desert scene for aalastor or a rocky canyon, look for scenery specifically labeled for 1:12 or "6-inch scale." You can also find excellent reference material on Wikipedia's entry on scale models to understand how different ratios work in a real-world context.
One trick I use is the "measurement check." If you're making a stone wall, don't just guess. Measure the height of your figure's leg. If a standard brick is about 3 inches long in real life, a 1:12 scale brick should be exactly 0.25 inches. If it's not, your scene will look "off."
It's also worth noting that scale isn't just about the size of objects; it's about the texture. A high-detail 1:6 scale figure like a Hot Toys collectible requires much finer detail in the background than a standard Hasbro figure. If the background textures are too chunky, the figure will look like a giant standing in a miniature world.
How Can I Add Realistic Lighting?
Lighting adds depth and atmosphere, but it must be subtle enough to avoid looking like a toy in a brightly lit room.
I've found that the biggest mistake collectors make is using a single, harsh light source from the front. This flattens the scene and makes your diorama look like a stage play rather than a real environment. Instead, use multiple light sources to create shadows and depth. If you're building a dark, gritty alleyway, you want a single flickering light from a "street lamp" rather than a bright LED strip across the top of the shelf.
Here are three ways to implement lighting:
- LED Strips: Great for general ambient light or "glow" effects behind a wall.
- Micro LEDs: These are tiny, often found in fairy lights. They are perfect for hiding inside small crevices or making a "broken" light fixture.
- Fiber Optics: If you want to create a starfield or a very specific, pinpoint light source, fiber optics are the way to go.
Before you start drilling holes in your diorama for wires, make sure you've thought about the power source. You don't want to be fighting with a battery pack in the middle of a finished scene. If you're using a display case, you might want to look into finding high-quality lighting for your display shelves to ensure you aren't accidentally overheating your electronics or damaging your paintwork with too much heat.
A quick tip: Use warm light for indoor or "homely" scenes and cool/blue light for sci-fi or outdoor night scenes. It makes a massive difference in the mood. A warm glow can make a scene feel cozy, while a harsh white light can make a scene feel clinical or even a bit eerie.
What Are the Best Texturing Techniques?
Texture is what separates a "painted box" from a realistic environment. You can achieve this through physical carving and layered painting.
If you're using XPS foam, don't just paint it a flat color. Start by "distressing" the foam. Use a ballpoint pen or a crumpled piece of aluminum foil to press into the surface. This creates pits, cracks, and unevenness that looks like natural wear and tear. Once the texture is there, the paint will catch in those grooves, creating a much more realistic look.
The "Dry Brushing" technique is your best friend here. Once you've applied a dark base coat, take a lighter color on a brush, wipe almost all of it off onto a paper towel, and lightly flick it over the textured surfaces. This highlights the edges and gives the scene a sense of depth. It’s how you get that "weathered" look that makes a diorama look lived-in.
The Workflow of a Professional Diorama:
- Phase 1: Structural Build. Glue your base pieces together (foam, wood, etc.).
- Phase 2: Texturing. Carve, scratch, or add textures while the material is still "soft."
- Phase 3: Priming. A matte black or dark grey primer is usually best.
- Phase 4: Base Coating. Apply your main colors.
- Phase 5: Weathering. Use dry brushing, washes, or even real dirt/sand to add realism.
- Phase 6: Final Details. Add your lighting and your action figure.
One thing to watch out for—and this is a big one—is the paint on your figures. If you're building a scene that involves a lot of "dusting" or heavy-handed weathering, make sure your figures aren't touching the wet paint or the textured surfaces. You don't want to ruin a $50 figure because a piece of foam "sand" got stuck in its joints. If you're worried about figure stability, check out why figures might be leaning and ensure your diorama provides enough support or a stable base for them to stand on.
The goal is to create a world that feels like it exists outside the frame. Whether it's a crumbling ruin from a fantasy RPG or a high-tech laboratory, the detail is in the imperfections. Don't aim for perfection; aim for character. A perfect, smooth wall looks fake. A wall with a chip, a scratch, and a bit of grime looks real.